

Support Forums
If you need help or if you have questions or any kind of comments, please use our Support Forums. There you will also find answers to questions from other users.
A quick registration is required, which will ensure that you are notified as soon as a reply is posted to your comment.
Before posting in the forums please make sure to check the FAQ!
If you're completely new to NetSetMan, have a look at the help file first!
Help File / Software Description
A detailed help file comes with the program. The latest help file is also available online so you can have a direct look at the features of NetSetMan (Pro). Simply choose your language below!
FAQ
Changing network settings is an administrative procedure. Therefore NetSetMan generally requires administrator privileges to work correctly. For this reason, the integrated Windows service “NetSetMan Service” has been created. Starting with version 4.0, this Windows service is automatically enabled during the installation to automatically provide NetSetMan with the required privileges. In previous 3.x versions this service had to be activated manually in the program preferences.
The NetSetMan Service accomplishes the following tasks:
- No UAC prompt at program start.
- The program can be used with a limited Windows user account.
- Optional profile switching from the Windows logon screen. This feature can be activated at Preferences › System Privileges, if required.
Further details: Help File › NetSetMan Service
The AutoSwitch feature enables you to automatically activate profiles based on predefined conditions like surrounding wireless networks, network locations, adapter states, or time frames.
Please make sure to read this chapter in the help file as it contains all the basics and details you need to know to get started. Once you've become familiar with the functionality, you should be able to address almost all thinkable use cases.
Additionally, it might be helpful to understand the following background details:
- Network Events: Depending on the configured conditions NetSetMan creates system event handlers so that it's able to react to related changes on your system and in your network. This means that using AutoSwitch won't slow down your system by constantly scanning for changed parameters. This also means that NetSetMan depends on those system events, so that sometimes it might take a moment longer for the profile activation to be initialized. For example, if you unplug your LAN cable, Windows will take a couple of seconds to realize that. You will notice that your network icon won't be crossed out immediately. The moment when this icon changes is when NetSetMan receives a notification about a network change and can react to that.
- Priorities: As soon as NetSetMan receives a relevant network change notification it starts comparing the current network information with the conditions configured in its profiles. Starting with the first profile (ID 0) the sequence continues in ascending numerical order until a match is found (or nothing matches at all). This means that profiles with lower IDs have a higher priority (you can change the profile order in the Profile Management). So, if the conditions for profile #2 and profile #6 are met, only profile #2 will be activated.
- Cancelling/Skipping: By cancelling an automated profile activation that profile will be skipped as long as the matching network conditions don't change. As soon as its conditions aren't met anymore it's removed from the internal skipped profiles list.
- Active Profile: If the first profile that matches its conditions is the current profile (= latest manually or automatically activated profile) it won't be activated again. This also applies if you restart the application (or the system).
New Option in v4.2.0: "At program startup, check conditions regardless of last profile activation" -
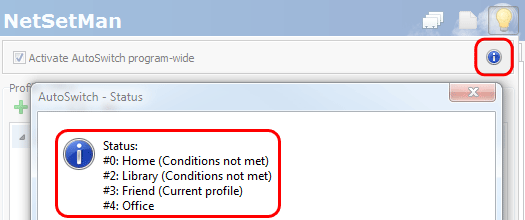
AutoSwitch Status: By clicking the AutoSwitch info button (or viewing its tooltip) you will receive the current AutoSwitch status. This is helpful if you want to find out details about it.
What is IPv6?
Do I need it?
What IPv6 features does NetSetMan have?
What do I need to use IPv6?
If you're using XP, you need to have SP1 (better SP2/SP3) installed. IPv6 is then installed in a deactivated form. If you really want to use it, you need to activate it by opening the command line (Win+R › “cmd.exe”) and typing:
netsh interface ipv6 install
If you change your mind at a later point, you can always deactivate it again by typing:
netsh interface ipv6 uninstall
How do I distribute the settings?
- The file is located directly in the program folder.
(e.g. C:\Program Files (x86)\NetSetMan Pro\) - You only need to back up/copy this file as it contains all profiles and program settings. In contrast to previous versions, NetSetMan Administration settings are included in that file as well, in case you are using that feature. They are automatically transferred to the registry if the program is run from the installed program folder.
-
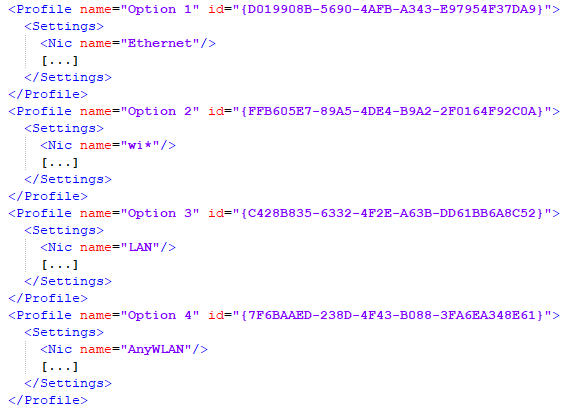
Each NIC on any system has its own unique ID by which it can be identified. As a result, the NIC assignments become non-functional when the settings file is copied to another system. However, NetSetMan will automatically try to reassign all NICs based on their names. If you prepare the settings file for distribution, you have multiple options to make sure that all preconfigured profiles are correctly assigned to the available network adapters.
- Exactly the same name: "Ethernet"
- Name with wildcards: "wi*" ⇒ "Wi-Fi", "Wireless Network Adapter", "Wifi #3", ...
- Generic: "LAN"/"WLAN"⇒ This will assign the first available wired/wireless hardware NIC.
- Dynamic: "AnyLAN"/"AnyWLAN"⇒ This won't assign any specific NIC, but set the dynamic option, so with every profile activation the first suitable NIC will be used.

[Old description for deprecated version 4.x]
- The file is located directly in the program folder.
- You only need to back up/copy this file as it contains all profiles and program settings. In contrast to previous versions, NetSetMan Administration settings are included in that file as well, in case you are using that feature. They are automatically transferred to the registry if the program is run from the installed program folder. HKLM\Software\NetSetMan (x64: HKLM\Software\Wow6432Node\NetSetMan)
-
Each NIC on any system has its own unique ID by which it can be identified. As a result, the NIC assignments become non-functional when the settings file is copied to another system. However, NetSetMan will automatically try to reassign all NICs based on their names. If you prepare the settings file for distribution, you have multiple options to make sure that all preconfigured profiles are correctly assigned to the available network adapters.
You can deploy a prepared settings file automatically during the installation using a certain parameter or location.
How do I distribute the licenses?
After this step, the license information is taken from the license file and stored in a system-bound form (lic.dat) in the program folder. Copying this file to another system will automatically make it invalid. This means that the end user won't be able to transfer the license without your consent.
You can deploy the license file automatically during the installation using a certain parameter or location.
If you purchase multiple license packs with the same customer account, the total number of licenses in your account is added up. This allows you to interchange the license files in any way you like. For example, if you purchase three license packs, each with 10 licenses, you can also use one of the three license files on up to 30 systems, ignoring the other two license files.
What administration options are there?
Command line parameters
Setup:The following parameters can be used with NetSetMan Pro 4.x to create automated (remote) installations. Multiple parameters can be combined.
-
Installation without user interaction, with visible installation progress:
/SILENT -
Hidden installation without user interaction:
/VERYSILENT -
Miscellaneous:
/AUTORUN=true/false (Run minimized when user logs on; Default: true)
/UPDATECHECK=true/false (Notify about updates at program start; Default: true)
/LOGON=true/false (Enable Pre-Logon Profile Switching; Default: false) -
Including a license, settings and logo file with absolute, relative or network paths:
/LICENSE="C:\Full Path\license-file.nsmp5" (NetSetMan Pro 5.x license file)
/SETTINGS="prepared-settings-file.xml" (Prepared settings file)
/LOGO="\\server\company-logo.png" (License packs with 30+ licenses allow including a company logo)
Files will be copied to the program folder so they don't need to remain in their original location after the installation.
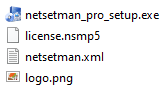
Tip: Instead of passing the file paths as parameters, you can also place the prepared files into the same folder as the Setup.exe, naming them as follows:
license.nsmp5, netsetman.xml (4.x: settings.ini), logo.png
Update:
-
Upgrade to NetSetMan Pro 5.x.y:
netsetman_pro_setup_5xy.exe /VERYSILENT
Deregister:
-
Alternatively: Command line parameters
"C:\Program Files (x86)\NetSetMan Pro\netsetman.exe" -deregister
NetSetMan Service:
As of version 4.x, the integrated Windows service is installed and activated automatically. Manual control (for older versions) is possible using the following commands.
-
Installation / Uninstallation (/SILENT = without user interaction):
[installation path]\nsmservice.exe /INSTALL /SILENT
[installation path]\nsmservice.exe /UNINSTALL /SILENT -
Manually start or stop the service:
net start nsmService
net stop nsmService
Application:
Our licenses are not linked to a certain system. You only have to make sure that the number of coexisting installations is not greater than the number of valid licenses. One license is required per system (device or VM). A license can be transferred from one system to another.
As a rule, we assume that every business customer has their own software and license management within the corporate network, capable of monitoring systems in real time or continuously. This gives you a full overview at all times of which software is used where. Such management software is practically indispensable; otherwise, all software usage would be uncontrolled and compliance with license agreements (not only ours, but any software) would be impossible. A controlled central deployment would also be advisable to ensure the software only ends up where it is permitted to be used.
In principle, our licensing system is very simple: install and register NetSetMan Pro only where you actually need it. Uninstall the software when you no longer need it on a system or when you want to free up the license for another system, so that the license is automatically deregistered in the background. Our license server handles many special cases in a customer-friendly manner, so separate intervention is usually not necessary. If something does go wrong and you unexpectedly reach your license limit, a management option is automatically enabled temporarily in your customer account so you can quickly resolve the issue yourself.
Some facts worth knowing
- All licenses of the same major version that belong to the same customer account are internally grouped together on the license server. You can therefore choose a single license file that you use on all your systems.
- If you have multiple license files, please make sure you do not register different license files on the same system, so they are not counted multiple times.
- Repeated activation of a license on the same system does not increase the activation counter because the system is identified by the hardware.
- No prior deregistration is required for an update, formatting, or replacing the hard drive.
- Unfortunately, merging different customer accounts is technically not possible. Licenses that belong to different accounts are inevitably handled as separate license pools.
- We have improved registration several times over the years, so registration issues in older versions (< 5.2.0) have long been resolved; however, without current updates you may still be affected. Please keep your installations up to date!
Deregistration
- Manually via the program settings:
Program interface › Preferences › License › Deregister
The advantage is that you are informed immediately whether it succeeded or failed. - Automatically via uninstallation:
"C:\Program Files (x86)\NetSetMan Pro\unins000.exe" (Optional: /SILENT, /VERYSILENT) - Automated via parameter/command line:
"C:\Program Files (x86)\NetSetMan Pro\netsetman.exe" -deregister
Important: Deregistration is only possible with an active internet connection. In addition, only the currently existing registration can be deregistered, so uninstalling an unregistered version does not trigger deregistration.
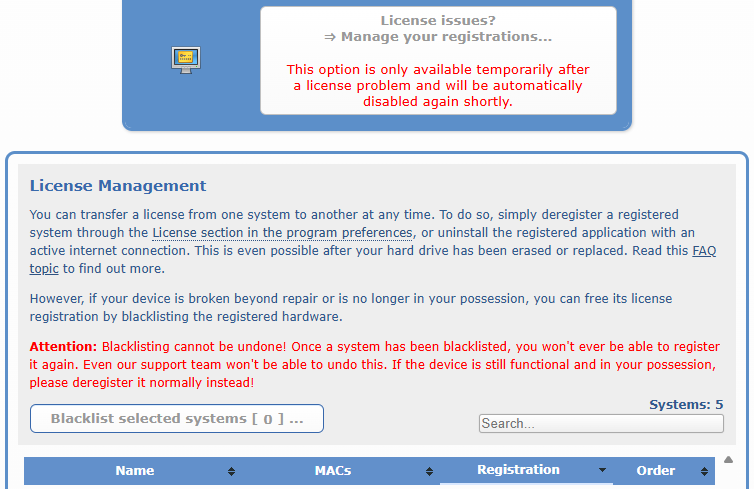
Registration management
As soon as a licensing problem occurs, a temporary management option for the registered systems is automatically activated in your customer account. This is indicated in the error message of the failed registration. To resolve such issues as quickly as possible, please pay close attention to the contents of the error message in detail. This option is not always available, but only for targeted problem resolution, because processing registrations is computationally intensive depending on the customer and would place too much demand on license server resources if provided permanently.
This management option is not an essential or guaranteed feature; it serves solely as a last resort if the normal measures have not worked. Manual activation outside of a registration problem is therefore not possible, because at that point there is no restriction on license usage.
Here you can view all currently registered systems and compare them with your own software management. However, normal deregistration is not possible there, as deregistration can only be performed directly on the systems to ensure the software has actually been removed. You do, however, have the option to permanently and irrevocably block systems with hardware that no longer physically exists by adding them to a blacklist, thereby freeing up their registration again.
Duplicate registrations
- If these are different licenses, deregister the unwanted registrations. In general, it is best to choose a single license file and use it on all systems to simplify management.
- If it is the same license, then there may be an error in the registration due to an outdated version that could occur in rare constellations (< 5.2.0). Please update to the latest version first and then run the software once so the registration data can be refreshed. Afterwards, contact us so we can perform the final correction.
Do not use the blacklist for duplicate entries under any circumstances, because permanently blocking a system applies to all licenses in your account!
Solution options
If you reach the license limit, you generally have the following options:-
Deregistration: If a system still physically exists, you can deregister it yourself (even if the hard drive has already been formatted or replaced).
Install the latest NetSetMan Pro version on the system, start it, and register it using the originally used license file. You can then deregister it via the program settings or by uninstalling it. - Blacklist: If a system no longer physically exists (destroyed, sold, stolen), you can release its registration by permanently and irrevocably blocking it via blacklisting. This option is automatically enabled together with registration management in your customer account as soon as you run into a registration problem.
- Additional licenses: If you find that you need the software on more systems than you previously realized, you can purchase additional licenses in a new license pack. If you do this using your existing customer account, you can simply continue using your current license file.
If you purchase multiple license packs with the same customer account, the total number of licenses in your account is added up. This allows you to interchange the license files in any way you like. For example, if you purchase three license packs, each with 10 licenses, you can also use one of the three license files on up to 30 systems, ignoring the other two license files.
Contact
If you cannot resolve your individual licensing issue with this information, feel free to contact our email support. Please note that our support team cannot perform normal deregistrations or blacklistings for you, as these can only be carried out by the license holder.- Customer number and order number
- Screenshot of the error message and the issue
- Computer names of the affected systems