

|
|
NetSetManHelp File |
| Help File Version | 5.0 |
| Supported Operating Systems |
7, 8, 10 32/64 bit |
| License | Non-Commercial Freeware or Commercial Pro Version View as HTML or PDF |
| Contact |
www.netsetman.com Support Forum |
Basics
- Description
- Basic Information
- Profiles
- Network Adapters
- Settings Editing
- Profile Activation
- Compact Mode and Full Mode
- Tray Menu and Tray Info
Settings
- Overview
- Advanced TCP/IP Settings
- Adapter Status
- WiFi
- Driver Settings
- Printer
- Workgroup
- System Settings
- Network Drives
- Connections
- SMTP / Email
- Hosts File
- Scripts & Programs
Features
- WiFi Management
- Network Tools
- AutoSwitch
- Notes
- NetSetMan Service / Limited User Account
- Pre-Logon Profile Switching
- Administration
- Command Line Activation
- Non-Commercial Freeware Message
Additionally in NetSetMan Pro
NetSetMan is a network settings manager software for easily switching between your preconfigured profiles. Combined with an outstanding Wi-Fi management and practical networking features, it is an essential tool for every laptop user.
|
Additionally only in the Pro version:
|
NetSetMan offers what you've been missing in Windows until now:
A powerful, easy-to-use interface to manage all your network settings at a glance. Give it a try and you'll never want to be without it again.
All settings and changes are automatically saved in a separate file (netsetman.xml) so that they can be easily backed up and transferred.
Activate a stored profile with one click or even completely automatically!
-
ProfilesEach profile represents a set of settings that are required for a certain location or scenario. By using subprofiles, multiple network adapters can be configured with a single profile. Profiles can be organized in profile groups.
-
Manual configurationYou need to configure the required profiles manually yourself. It's not possible to guess the correct settings for an unknown location. The main purpose of the application is to automate regular settings changes that you would usually do manually.
-
Selection of settingsGetting all current settings into a profile can give you a starting point, but you still need to decide which settings to apply when activating that profile. It's strongly recommended to limit the active settings to those that might actually change. For example it isn't necessary to apply a computer name if this setting is never changed.
-
Configuration of settingsTo configure a setting, check its checkbox and either enter the desired configuration directly in the main interface or open the configuration dialog for that particular setting.
-
Profile activationBy default, no profile is activated automatically, i.e. no setting on your system is changed without your intention. Having said that, you can use the AutoSwitch feature to activate certain profiles automatically based on customizable conditions.
-
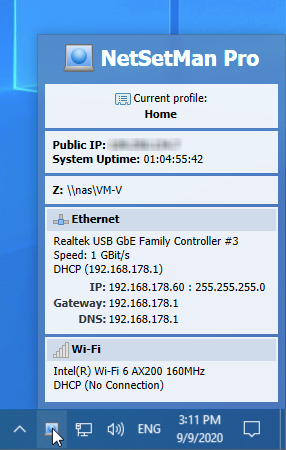
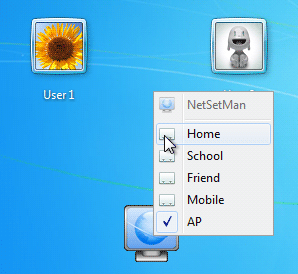
Tray iconIt's recommended to keep NetSetMan minimized in the tray and move its icon into the always visible area. That way, you can quickly activate a profile by clicking the icon and selecting a profile. Additionally, you will get a useful overview over all current IPs (and optionally further settings) just by pointing at the icon.
A profile contains one or multiple sets ("subprofiles") of settings. All of them will be activated one after another when the profile is activated. You can rearrange their order by drag-and-drop.
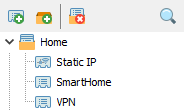
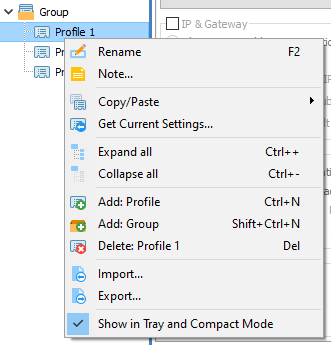
Profiles are organized in groups in the profile tree. Use can use drag-and-drop, the right-click context menu and common keyboard shortcuts (arrow keys for navigation, F2 for renaming, F3 for searching, etc.).
Profiles and groups can be created, deleted and searched through the profile tree menu bar.
All changes are saved automatically so nothing gets lost accidentally.
The tooltip of a profile gives you a quick insight into the settings it contains. Selecting a group, displays an overview of all its profiles and their settings.
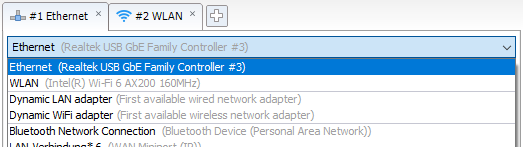
All available network adapters are displayed by their name and their type. Select the network adapter you would like to manage in the current (sub)profile.
The list is updated automatically at program start, but you can also update it manually using its right-click context menu.
If you copy the settings file (netsetman.xml) to another system, the selected network adapters do not exist there, so the selections are no longer valid. A similar problem could occur after a major driver update, causing Windows to treat an existing network adapter as a new device. NetSetMan will then try to reassign all network adapters in the profiles automatically using the network adapter name and its MAC address. Additional options for professional use are described here: Distribution in Company Networks.
Getting Current Settings
- To read in a current setting from the system into a profile, click on the corresponding arrow button.
- To read in all current settings, right-click the profile and choose Get Current Settings.
Clearing Settings
- To clear the configuration of a certain setting, right-click it and choose Clear.
- To clear the values of an IP field, simply double-click on its corresponding caption.
Copying & Pasting Settings
- To duplicate a profile, use Copy/Paste in the context menu of the profile or simply press Ctrl+C/V.
- To copy and paste only a specific setting, right-click it and choose Copy/Paste.
To apply all settings of the current profile, click the Activate button or if the program is running minimized select the profile from the tray menu. Notice, that only settings with a checked checkbox will be activated.
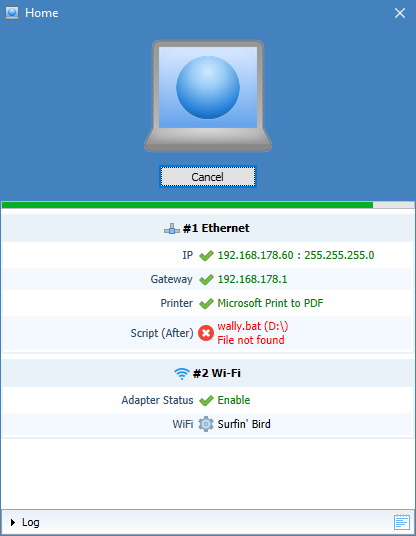
The Activation dialog contains information about the current activation progress.
There you can see which settings are going to be applied and whether the process is successful or not. You can cancel the activation process by clicking the Cancel button at any time, however not all settings can be stopped immediately, so it might take a moment for the current action to complete.
Before applying IP settings, NetSetMan first checks if they are different than the current system configuration. In case they are exactly the same, NetSetMan will skip this step and continue immediately without any delay. You will see a "Skip" message next to the address. If you want to force an update of the IP configuration in your system (even though nothing changed), you can do this by setting the Adapter Status to Restart in your profile. Windows will then reinitialize the network adapter configuration.
All changes are applied immediately. However, in certain cases some settings take a short while to take full effect or require a reboot (especially PC Name and Workgroup/Domain).
To view more information and error messages in full length open up the section at the bottom.
To find solutions for the most common errors and problems, visit our FAQ and our support forum.
Additionally to the default "Full Mode" UI, where you can configure the settings and structure of your profiles, the "Compact Mode" UI is available. You can switch between those modes at any time by clicking the according button in the menu.
Once all profiles are set up, the Compact Mode is the ideal interface. Here you have a compact overview of all profiles and their settings, without having to worry about accidental modifications.
In case you use the Administration (with Change profile settings being unchecked), the Compact Mode will be used automatically to prevent the user from being able to modify settings.
The program icon in the notification area is an important part of NetSetMan.
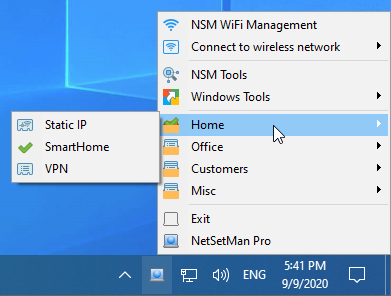
Right-Clicking the icon opens the Tray Menu where you can quickly activate a profile and access program tools.
Hovering over the icon views the Tray Info with all important IP and system settings currently active on your system. You can customize the displayed information in the program preferences. All data is gathered in real time, so there might be a short delay depending on the additional settings you have selected.
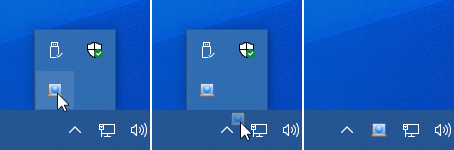
- Click the arrow symbol in the notification area to view all hidden notification icons.
- Drag NetSetMan's icon from the hidden area to the always visible area.
- Drop it in the position you would like it to be ready at your service.
Optionally, you can change the icon clicking behavior to open Tray Info as an always-on-top dialog that can be placed anywhere on the screen. Its text can be selected and copied. The displayed information is updated automatically every couple of seconds, as long as no text is selected.
The left/right/double-click behavior can be configured in the program preferences to your needs.

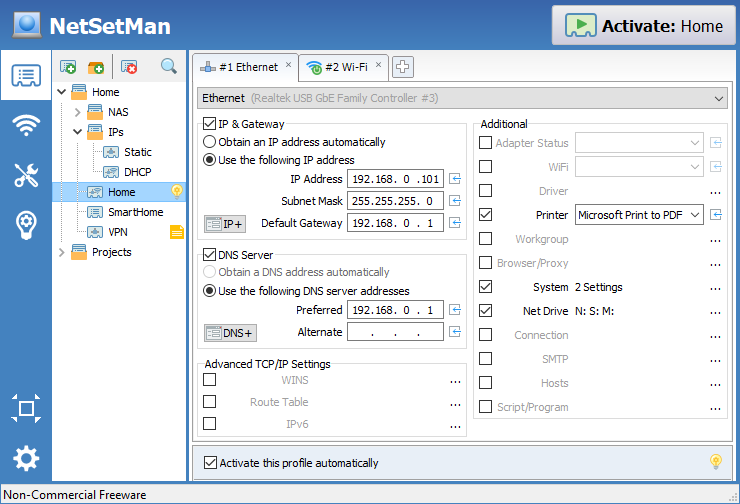
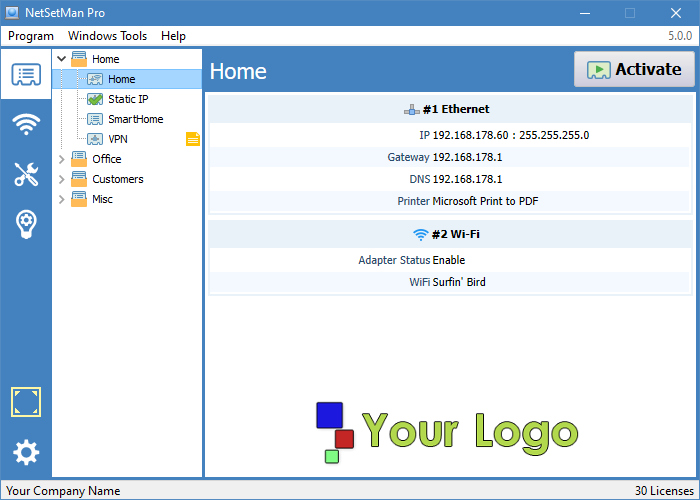
NetSetMan is designed in a way that allows you to have a direct overview of all configured settings within a profile. Some settings like the primary IP addresses, WiFi connection and the default printer can be configured directly on the main interface. Other, more complex settings can only be enabled here and will show a brief overview over their current configuration. To modify them, activate them first, then open the according dialog by clicking the […] button.
The following sections will give you basic instructions and useful tips on how to use all the settings and features.
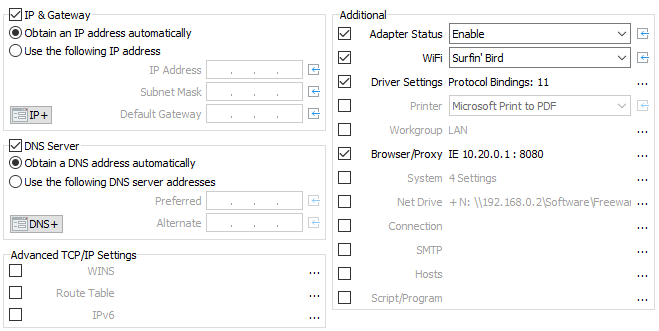
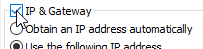
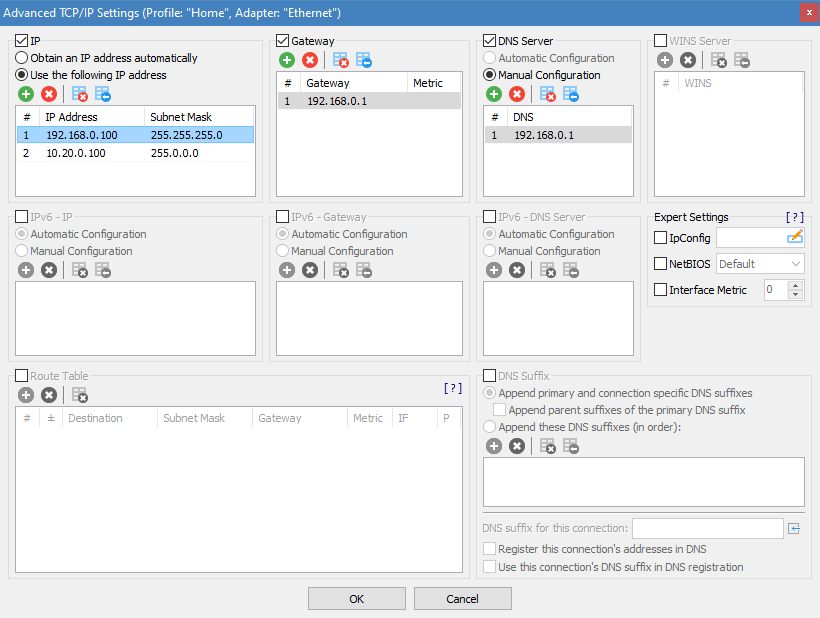
IP, Gateway and DNS addresses are a core feature of NetSetMan, that's why they can be configured directly on the main interface.
If you want to add multiple IP, Gateway, DNS and WINS addresses to a network adapter so you can be in several networks at the same time, you can do this by clicking the IP+ button.
Here you also have the possibility to manage more advanced settings like IPv6 addresses, Route Table, DNS Suffix, IPConfig, NetBIOS and Interface Metric.
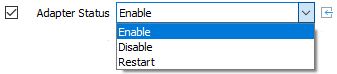
You can enable, disable or restart the selected network adapter.
If you want to enable one adapter and disable one or all other adapters, you need to create subprofiles for each of the adapters. You can do this manually or by using the context menu, which can automatically create a subprofile for each network adapter that is included in the adapter list and configure its status setting accordingly.
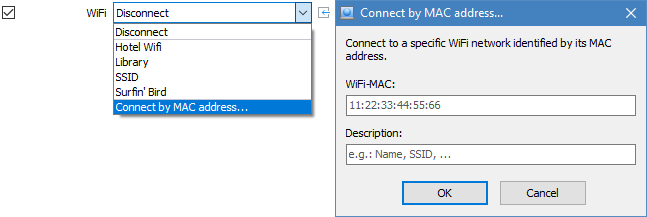
A NetSetMan profile can be used to connect to a wireless network using an existing WiFi profile. To do this, select a WiFi adapter in your profile, then select a WiFi profile from the WiFi dropdown list. Or choose Disconnect to terminate any existing connection.
Connect by MAC address
Windows usually connects to wireless networks based on the SSID. If multiple access points share the same SSID, Windows groups them and connects to the access point with the best signal. However, sometimes you may want to connect to a specific access point. With NetSetMan you can do that!
If you want to connect to a specific wireless network when activating a NetSetMan profile, you can do so by adding its MAC address to the WiFi selection. Choose "Connect by MAC address…" and enter the MAC address of your choice. When activating the profile, NetSetMan will connect to the corresponding access point. Note that you must nonetheless have a suitable WiFi profile configured on your system.
You can also use the NSM WiFi Management to manually connect to any specific access point.
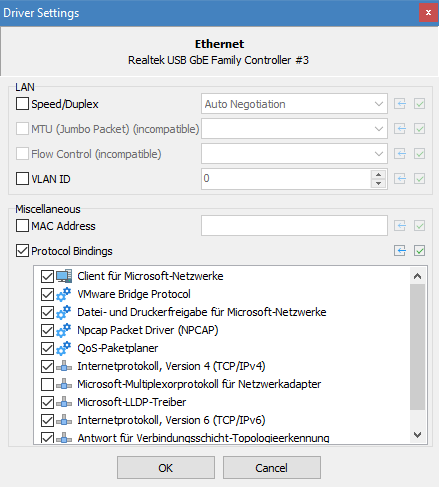
Hardware-specific settings depend on the capabilities of the network adapter and its driver. Especially the settings that are only available for wired adapters (Speed/Duplex, MTU/Jumbo Packet, Flow Control and VLAN ID) might be disabled or restricted depending on the network adapter.
Changing the MAC address should only be done if you know exactly what you are doing. Although the actual hardware address is unchangeable, it can be overwritten in the system so that Windows uses the modified address. It may be necessary to reboot the system afterwards to ensure that the changes are fully reflected in the system and network.
Protocol bindings can be enabled or disabled as needed. For example, IPv6 and file sharing can be enabled in one location and disabled in another.
If you're printing documents at different locations, you may want to change the default printer, so you don't have to select the correct printer every time you print.
The list of available printers is updated automatically when you open it.
The selected printer is saved by name. If you ever rename it, you would need to reselect it in your profiles.

The default workgroup in Windows is but you may want to change it in different locations. Be aware that a system reboot is necessary for the change to be fully applied.
Switching between workgroups and domains is possible with NetSetMan Pro.

Additionally to the normal network settings, sometimes you may want to change some system settings depending on your location or situation. For example, while at university you want to mute the sound volume, change the wallpaper and activate the Balanced power plan.
You can also use the System Settings dialog to quickly change some setting that would otherwise take more time finding the location of that setting in Windows. Simply click the
![]() button to directly activate that particular setting.
button to directly activate that particular setting.
Supported settings include: display mode, external display, wallpaper, desktop color, screensaver, design scheme, speakers & microphone volume, sound scheme, Windows firewall (incl. exceptions & notifications), power plan, time zone, computer name and Windows Update.

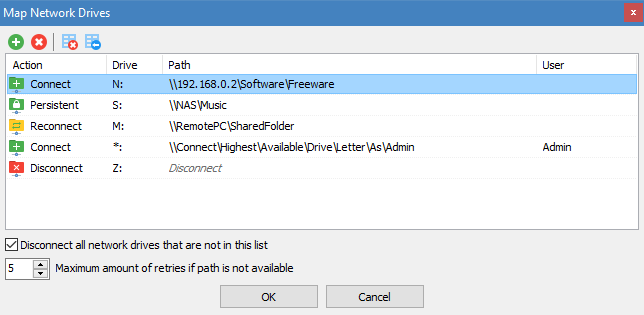
With NetSetMan you can map/connect and unmap/disconnect an unlimited amount of network drives.
When a profile gets activated, NetSetMan will compare the list of all currently connected drives with the list of the drives to be connected. All network drives that are in both lists (same drive letter and same folder path) will remain untouched. All other network drives will be disconnected before the new ones are connected.
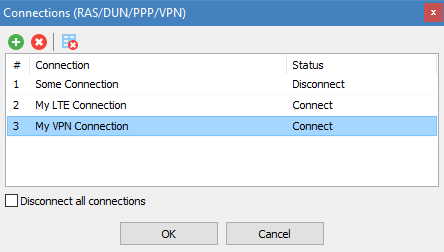
Use this feature to connect or disconnect any kind of Windows connection like dial-up networks, mobile broadband or VPN. Compatible connections are listed in Windows together with your normal network adapters in the Network Connections dialog. From a technical point of view all connections that are compatible with "RasDial" are supported.
You can choose to either disconnect all currently established connections by checking the checkbox, or to connect/disconnect some connections individually in order of the listing.
If your connection isn’t listed for some reason, you can manually add it by choosing Add… in the selection list and entering its name as displayed in Windows.
NetSetMan also supports several third-party VPN clients like OpenVPN, Shrew and Cisco. If your VPN client is compatible, NetSetMan will list its VPN profiles in the selection list.
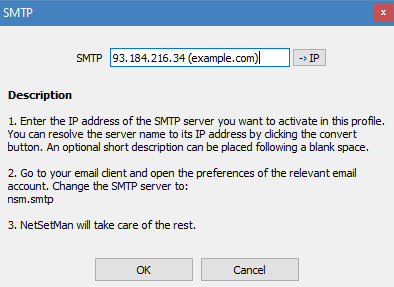
In some cases the IP address of the SMTP server for sending emails varies depending on your network. When you are in the same network, you might need a local IP address like 10.0.0.1, and when you are outside of that network you might need to access it by a global IP address.
Instead of trying to be compatible to a lot of different email clients and dealing with different user profiles, NetSetMan solves this issue with a simple workaround. Set nsm.smtp as the SMTP address in your email client and configure the IP addresses in the according profiles. When activating the profile both values will be linked using the local hosts file, so you don't need to do any additional changes in your email client anymore.
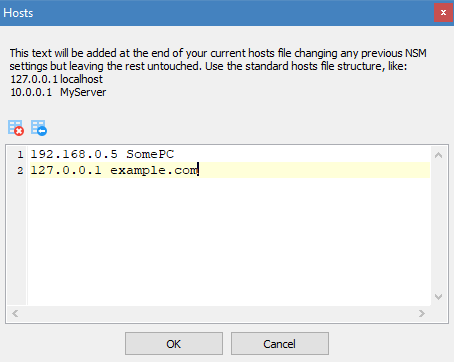
In very specific cases it might be necessary or useful to manually assign IPs to names or domains. Notice, that NetSetMan will only modify its own hosts entries leaving already existing entries untouched.
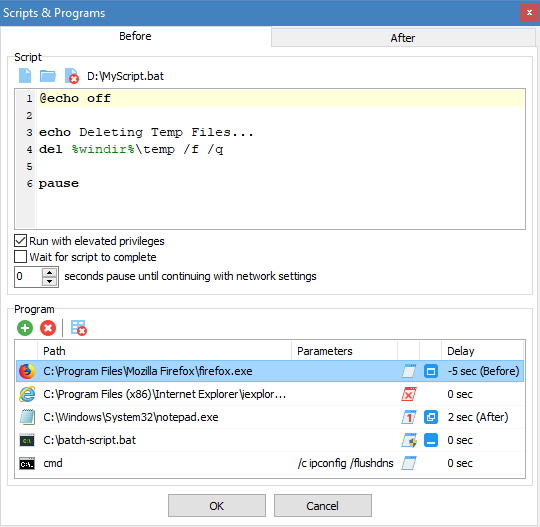
NetSetMan offers a comfortable way of managing script files. However, it has no own script language, meaning you can only use script languages your operating system is able to execute. Common script languages are VBS, JS and command-line batch files. Use your favorite search engine to find more information about scripting and what you can do with it.
Open an existing script file or create a new one to be able to edit the script.
You can have two scripts that will be executed before and after all other settings are changed.
If you need a delay between running the script and changing the network settings, you can specify it as well.
Program execution
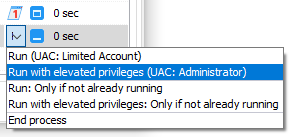
NetSetMan offers a convenient way for running external programs with each profile.
Programs can be launched in a limited user context (default with UAC enabled) or elevated with administrator privileges (without triggering a UAC prompt). Parameters can be added if required.
Programs can be launched normally, maximized or minimized (if supported).
Already running processes can be terminated based on their file name (regardless of where they are located) or based on their exact file path.
Each action can have an individual delay before (negative value) or after (positive value) execution.
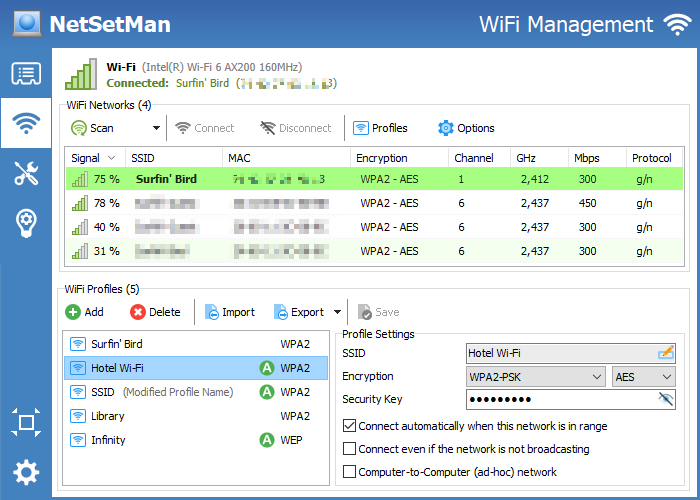
The NSM WiFi Management displays all available networks and access points without grouping them, so you can establish exactly the connection you want.
Each column offers additional tooltip details you might find useful. The right-click context menu lets you quickly copy the most important details to the clipboard. It also allows you to add descriptions or background colors for specific access points, making it easier to distinguish between ambiguous network names.
You can connect to a network by double-clicking it or using the Connect button. If there is no existing profile for this connection you can choose to create it first. The settings (authentication, encryption, …) will be pre-configured automatically depending on the recognized network, but you can adjust them if needed.
The two sections WiFi Profiles and WiFi Options provide additional functionality and can be shown or hidden through the toolbar buttons.

WiFi Profiles
Profiles for wireless networks are stored directly in Windows. NetSetMan provides a comfortable way to access and manage them. You can create, edit, delete, import/export and rearrange WiFi profiles.
WiFi Options
Additional options help you solving WiFi related problems by automating tasks in the background, so that you don't have to do this manually anymore.
-
Disable WiFi when LAN connected, otherwise enable it
NetSetMan reacts to Ethernet cables being plugged or unplugged and disables/enables your wireless network adapter accordingly. This makes sure, that wired connections are always preferred over wireless connections. -
Automatically switch to the WiFi access point with the strongest signal of the current SSID
If there are multiple access points for the same network and you are moving around between them, your connection could be improved by always switching to the access point with the best signal. Normally, your connection would get worse and worse before Windows finally drops it and connects to a better connection. -
Write log
If you are having trouble with your wireless connection, you can enable this option. NetSetMan will then monitor all WiFi changes and log them in a text file, so you can analyze it as needed.
Requirements
NetSetMan uses the native WiFi API of Windows. Make sure the service is enabled and running.
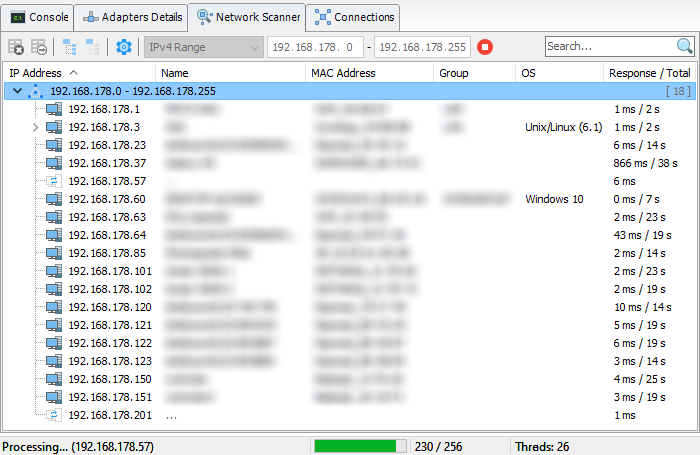
Additional built-in tools complete the network toolkit so that you are prepared for all kinds of network activities.
Console: Comfortable access to Windows command line network tools like Ping, Tracert, Nslookup, Netstat and Ipconfig.
Adapters Details: Access to all important details for all your network adapters in one place, incl. IPv4/IPv6 addresses, system IDs, protocol and driver settings, …
- Scan by IP range (IPv4 & IPv6), subnet (CIDR), ARP & NDP cache
- Get details like name, MAC, domain/workgroup, OS, network shares, etc.
- Multithreading for scanning large numbers of IPs simultaneously
- Highly compatible and flexible by using new and old protocols
- Copy details, open targets, export results, send Wake-On-LAN
- Favorites list for frequently used targets
- Detailed information of network printers (shared or directly connected)
- Real-time search filter for all results
- A special feature page about the built-in network scanner can be found here: www.netsetman.com/network-scanner
Connections: Check which network connections are currently active on your system, which applications have established them and where they lead to. You will be surprised to see what is going on with your system!
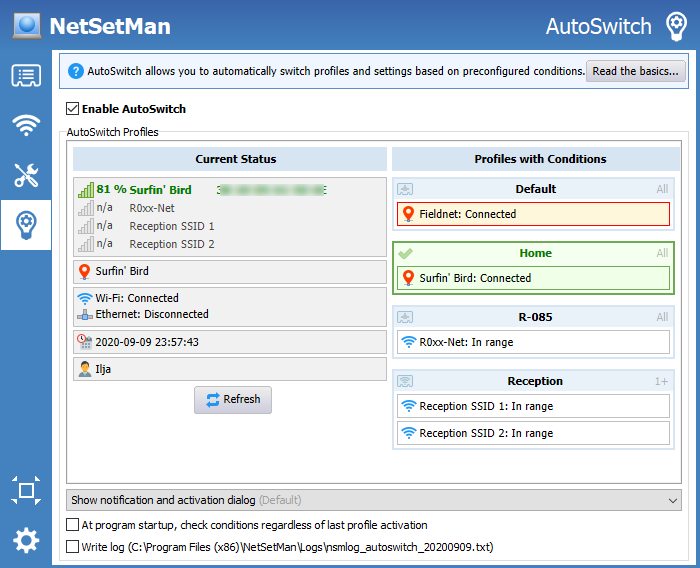
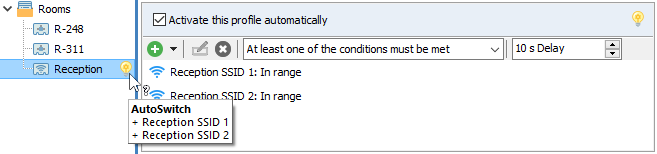
It's pretty easy to activate a profile with one click from the Tray Menu. But in some cases, it might be even easier to activate profiles completely automatically based on custom conditions. The integrated AutoSwitch feature does exactly that.
Conditions:
The following conditions can be configured for each profile separately:
- Wireless network (SSID or MAC) in/out of range
- Signal strength of a wireless network lower/higher than a certain value
- Connected/disconnected from a specific wireless network
- : Automatically generated network profiles by Windows (Vista and later)
- Gateway MAC: Fingerprint of the automatically assigned DHCP gateway
- Ping: Availability of a certain server or system in the network
- Connection status of a local network adapter (connected/disconnected)
- Certain days of the week and time frame (e.g. Sa+Su, 8:00 - 18:00)
- Currently logged on Windows user
Although there is no technical limitation for the amount of conditions per profile, try to keep it as simple as possible. In most cases, it is absolutely sufficient to include one or two conditions to achieve the desired result.
You can specify, that either all or at least one of the conditions must be met to activate that profile.
Profiles that are further up have a higher priority in case conditions for multiple profiles are met at the same time.
Overview:
If you set up AutoSwitch for multiple profiles, it might become difficult to understand why some profile is or isn't activated. The AutoSwitch panel will help you with keeping an overview of all profiles with AutoSwitch conditions and their current status.
You can see from the colors which conditions are met and which profile has been automatically switched. Green colors are used for conditions that are currently met, red colors for those that are not met and gray is used where the status has no relevance, because a previous profile already meets all conditions.
Here you can also configure general AutoSwitch preferences that apply to all profiles, like the appearance of the AutoSwitch notification.
The option Enable AutoSwitch enables or disables automatic profile switching in general for all profiles.
Automatic Profile Activation:
By default, the activation process is initiated with a message and a customizable delay countdown, allowing you to optionally abort the activation process. Alternatively, a native Windows notification can be used or the profile can be activated without any message in the background. In the latter case, the tray icon will be animated during the activation process and change its color temporarily according to the activation result to visually inform you about the automated process.
To save system resources, NetSetMan does not compare your current settings to the settings of the profile to be activated. This means that if you change any of your settings manually, NetSetMan won't notice the change.

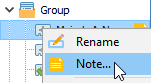
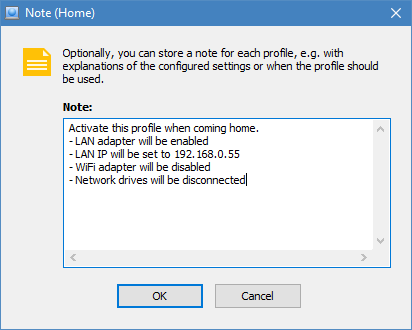
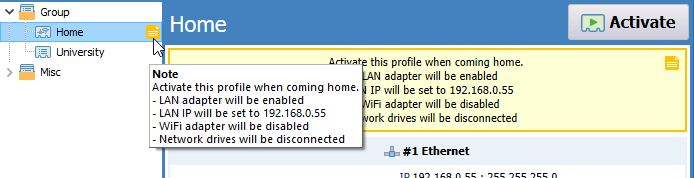
You can create short notes for every profile if you want to remember or instruct the purpose of a profile. If a note was created for a profile, an icon will be displayed in the profile tree. The note is then also visible in Full Mode as a hint of the icon and in Compact Mode at the top of the profile settings.
NetSetMan requires administrator privileges to be able to change network and system settings for you. Normally, running such an application isn't possible for a limited user account. Even administrator accounts display a warning dialog at each program start if UAC (User Account Control) is enabled.
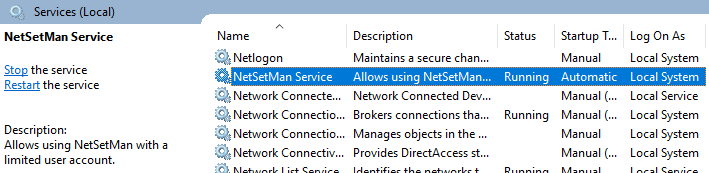
To solve this issue, NetSetMan includes a special component called NetSetMan Service that provides the main application with the required privileges.
The installed service is visible in the Windows Services dialog (services.msc) and can be controlled there as well. Additionally it can be installed/uninstalled or started/stopped using command-line:
If you get the error "Invalid signature", make sure the program exe hasn't been modified and the associated Windows group policy is disabled: .
If you run NetSetMan with a limited user account where NetSetMan Service isn't available, you will receive a message explaining the problem. As an alternative, you can input administrator credentials from a local account that NetSetMan will store encrypted in its settings file and use to launch itself with the required privileges. Notice, that in this case the application will run in the context of the user whose credentials were used.
A very unique and powerful feature is the possibility to activate your profiles on the logon screen. This allows preparing correct network settings that you need for your account by activating a NetSetMan profile even before logging on.
To use this feature, NetSetMan Service must be installed and the option Profile switching from Windows logon screen (Preferences › System Privileges) must be enabled.
Notice, that this feature only allows to change settings that are shared between all users. User specific settings cannot be changed outside of a user session.
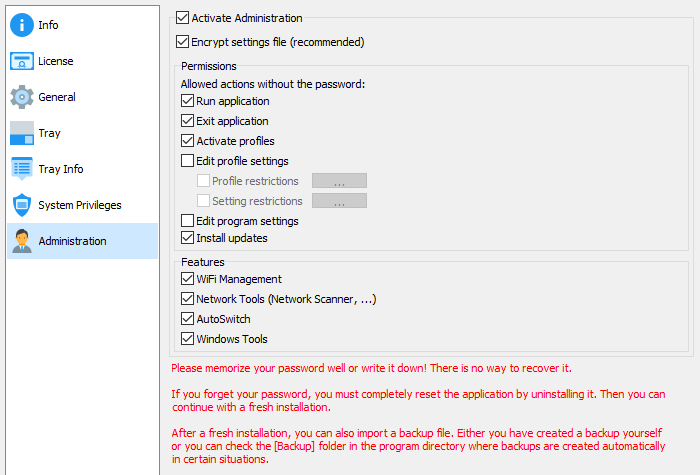
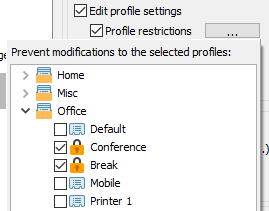
If you set up NetSetMan for being used by somebody else, you may want to specify what actions the other person is allowed to perform. With the Administration (Preferences › Administration) you can do exactly that.
When you activate this mode you will first have to enter a password with 6 or more characters. Only with this password you will be able to change Administration settings or perform the actions you have protected (run/exit NetSetMan, activate profiles, change profile settings, change program settings, install updates).
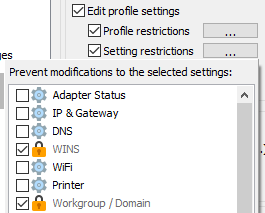
You can even lock certain preconfigured profiles, so the user cannot modify but is still able to activate them. Or you can generally restrict access to certain settings, such as Workgroup & Domain, while allowing the user to configure and use all other settings.
A checksum of your password will be written to the Windows registry. Make sure a normal user has no write privileges to (on x64: ). If you forget your password, you will need to delete that key manually. If your settings file is encrypted, nobody without the password will be able to view or edit it.
In some special cases you may want to activate profiles without using the GUI of NetSetMan: switching profiles with shortcuts, activating a profile on Windows startup, triggering profile activation from an external script, etc.
The following parameters are available:
| Command line help: View all available parameters and instructions | |
| Activate profile by name or ID # | |
| Activate profile in silent mode (Activation dialog will close automatically if no errors occurred) | |
| Activate profile with Windows notification | |
| Activate profile hidden (as tray icon) | |
| Run NetSetMan minimized | |
| Run NetSetMan in Full Mode (default) | |
| Run NetSetMan in Compact Mode | |
| Run a second instance of NetSetMan. Caution: All active instances write to the same settings file! |

This message in the main window appears on average every seventh program start for users of a workgroup and every second program start for users of a domain.
Unfortunately, this is necessary to remind users that NetSetMan is only Freeware for non-commercial purposes (= private or honorary). In sum: You may use the product for free as long as you don't save paid work time. If you would like to use the product for example at work or on a commercially used laptop, you are required to purchase a NetSetMan Pro license. There is no special regulation for educational or non-profit institutions. Professors, teachers and other employees may only use the Non-Commercial Freeware version if they're working in an honorary capacity (= unpaid).
Please read the license agreement for further information.
This message is not included in the Pro version, of course.

With NetSetMan Pro, you have the possibility to create an unlimited amount of profiles and groups.
The profile tree (introduced in version 5.x, replacing the old tab navigation) is the perfect way to organzize even large numbers of profiles. Groups can even be nested in several levels, allowing you to manage your profiles in any structure that suits you best.

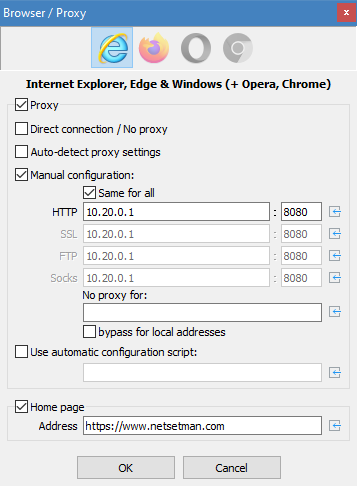
With NetSetMan Pro you can manage the proxy settings of Windows / Internet Explorer and Mozilla Firefox. Chrome, Opera and Edge do not have their own proxy settings, but automatically use the system settings configured for Windows/IE.
If you would like to remove proxy settings when activating a profile, make sure to check the Proxy checkbox to indicate that you want to apply changes to your proxy configuration, then select Direct connection / No proxy.
Additionally, you can change the home page and in case you're using profiles in Firefox you will also be able to select the profile name.
Please notice, that Firefox must be closed before changing its settings.
If you have multiple Firefox profiles and their profile folder changes (e.g. because of a new system), you will need to re-select the profile in the list, so it gets updated in your settings file.
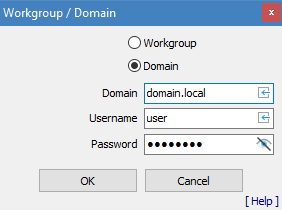
To join a domain, enter its name, your user name and your password. The password will be stored encrypted in the program settings file.
In NT domains a user can only be member of exactly one domain at the same time. This means that by joining another domain or a workgroup, your membership in the previous domain is lost until your system is rejoined.
NetSetMan can only join you to a domain if your domain user account has the permission to do so.
This user account privilege is called "Add Workstation to Domain" and must be enabled on your account. If you don't have this privilege, ask your network administrator to grant you that. Otherwise, you won't be able to join the domain again by yourself after leaving it.
NetSetMan Pro offers several assisting features that help you with distributing the software with pre-configured settings and your license more easily in your company network. You will find everything you need to know in a detailed description in the technical FAQ.